|
|
Toll Free: 800-BCD-MPEG |
Video & DVD Recorders Now from Niagara Video |
Niagara Video Acquires HDi-250, HDi-SDI & DVD-1150
|
BCD Closes Business as of 1 November 2018 We will remain working until all orders are shipped. |
| Niagara Video Acquires HDi-250, HDi-SDI, and DVD-1150 Order now from Niagara Video Our principal owner is retiring and we have sold the rights to our two main products: |
HDi Important Features
HDi-250 HD Recorder Important Features
|
or Direct To USB or to Optical Disc You install at leisure. |
BCD HDi Menus
(v2.4e)
Last updated 2016-02-18
Contents
UP from the Main Menu - The System Menu
DOWN from the Main Menu - The Video Menu
BCD HDi Main menu - Press the green Menu Button
Use the Up/Down arrows to go between Menu Topics
All the Menus are circular so if you scroll down far enough, you will be at the “top” and the items will repeat. Likewise with Right (>) and Left(<) you’ll end up where you started.
In the descriptions below, the top line is the Menu Topic shown on the top line of the front panel Menu display. Individual selections are below.
Use the Right (>) and Left(<) buttons to scroll horizontally through the items.
For simplicity, the examples below use the “>” right arrow, but you may use either. With experience you will learn the shortest way to your menu items.
When you see an item you like, press the green Enter button to select that item.
A “+” plus sign will appear to the left of selected items..
When you’re finished, BE CERTAIN to scroll down(or up) and SAVE YOUR SETTINGS!.
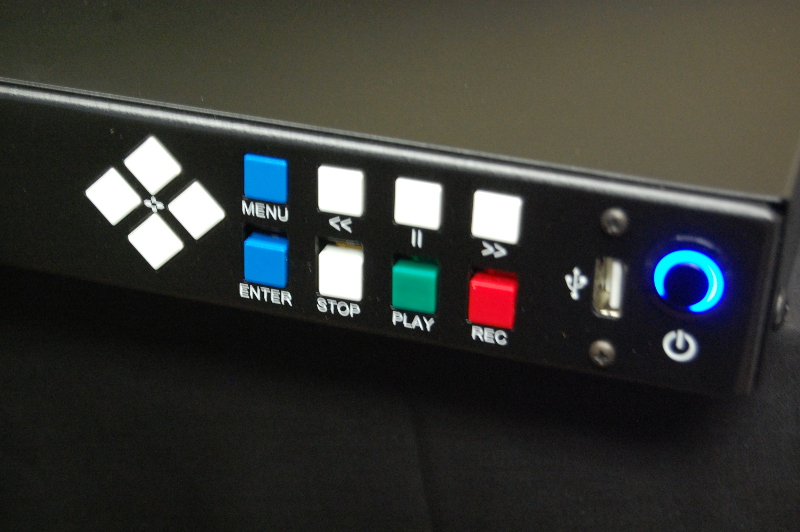
Control Buttons
Left side: Navigation “Arrow” buttons
Top Row: Menu(blue), “<<”(reserved), “I I“(Pause record, pause playback,, engage E-E loop through when in Stop), “>>”(reserved)
Menu: Toggles the Menu System.
“<<”: Reserved
“I I”: Toggles Pause during Play or Record.
Engages E-E Loop-through when in Stop.
“>>”: Reserved
Bottom Row: “Enter” button, “Stop”, “Play”, “RECord”.
also, front USB jack and main Power button.
Enter: Engages the shown selection.
Marks a file for further action when Play Menu is shown.
Stop: Stops record or Playback.
Press and hold for 10 seconds to stop a lengthy process,
Play: Press #1 shows the most recent file recorded. Use < > to scroll.
Press #2 Plays the displayed file.
REC: Press #1 engages E-E(if Record Only has been selected)
Press #2 causes RECording.
Press #3 Shows Record Duration menu.
Scroll <> to see Custom Duration, 4 hours, 2 hours, 1 hour, ½ hour.
Custom Duration is Time of Day
Recording stops when time limit is reached.
The Display
Display Top Line is the Topic
Display Bottom Line is the Item
When you press the Menu button you will see a 2-second display of:
Main
Menu
Then you will see:
Utility < Enter > Learn (use the right/left buttons to scroll the bottom line Items)
Eject the Optical disc : press Enter to eject Up/Down Changes Menu > Right/Left=Values > Enter=Set, Menu=Done, Save_Menu-->Permanent > Play the Help Video > Reboot into MemTest > Restart HDi Recorder > Safely Eject Front USB
NOTE: Press Menu then Enter to eject the optical disc. The eject button on the drive when the optical disc is selected.
UP from the Main Menu - The System Menu
Version display.
The current firmware version is shown.
Time Zone Offset
Use < > to change. USA Central Time is generally “-6”.
Set Date and Time
Current Date/Time is displayed. Press Enter to begin changing.
Press Enter to move from one unit to another: For example, Enter moves from Year to Month; moves from TensOfHours to Hours.
Network Configuration
Use DHCP Address > Static IPV4 Address > Static Network Mask > Static Gateway Route > Use Static Address > HW: MAC address.
NOTE: It’s easiest to press Enter at “Use DHCP Address” if your network permits.
Scroll <> to see the MAC Address. The MAC Address is assigned by the motherboard manufacturer. You need to know this for WakeOnLan control.
Remote Command Connect
Disable Remote Command > Telnet to IP Port 3021 > Serial 115K Baud. > Serial 57.6K Baud > Seriall 38.4KBaud > Seriall 19.2KBaud > Sserial 9.6K Baud > Remote Command Deck 00
NOTE: Port 3021 was chosen because it is the decimal of 0xbcd (in hexadecimal).
Serial communications are 8-bits, 1 stop bit, no parity.
Remote Command Deck 00 assigns Deck Number (DNUM) to a unit in multi-deck “party line” serial configurations. (Press Enter, then arrows to change deck number.
Special debug settings.
Enable debugging, disable debugging. Usually of no concern to end-users.
Manage the Video HDD.
Spin Down and Remove HDD > Reinsert and Spin Up HDD > Format Video HDD NTFS > Format HDD for WinXP > Format Video HDD EXT4,
NOTE: Video is usually stored on an internal Hard Disk Drive (HDD). Some HDi systems have a removable HDD. To avoid data loss (trashed video files) it is best to “Spin Down” the HDD before you remove it. Be certain that the system is in Stop mode before removing or inserting the HDD.
New drives must be formatted. If you plan to remove and use your HDD in another computer system, we suggest you format the HDD as NTFS for maximum interchangeability with Windows 2000, Vista, Win7, Win8, Win 10. NTFS is the BCD Factory format.
Save System Settings
Save as System Default
NOTE: This is IMPORTANT. This setting is the same as Save Settings at the ‘bottom’ of the Video Menu. Use at least one of them.
DOWN from the Main Menu - The Video Menu
E-E Video Loop Through
E-E Record Only > E-E Loop Record and Stop, E-E Loop Always Enable.
Video Output Connector
HDMI and Composite Out > HDMI and Component Out > HDMI and No Analog Out.
.
Video standard you use
All of the Standards > Film 23.98 > PAL 25.00 > NTSC 29.97 > XACT 30.00
NOTE: These settings are used by the Video Detection circuits. “All of the Standards” is very thorough but takes a little longer.
Detect the Video Mode
On Component In > On Composite In > On HDMI In
NOTE: Press Enter to begin the video detection process. “No Video Detected” will appear if no video is detected. Be certain to arrow to the ‘bottom’ of the list and SAVE as your default.
Video Input <Input Video Format>
This is for manual setting of video input format: Video Standard, Resolution and Frame Rate. It is a trio of menu sets for the 3 types of video connectors: Composite, Component, and HDMI.
Video Input Composite
Pal-SD 720 x576iI 50.00 > NTSC-SD 720x486i 59.94 > > No Video Mode Detected.
NOTE: There are only two possible formats for Composite.
Video Input Component .
NTSC-SD 720x486 59.94 > HD 1920 x1080i 59.94 > HD 1920x1080pP 29.97 > HD 1280x720 P 59.94 > HD 1920x1080p 59.94 > HD 1920x1080 60.00 HD 1920x1080p 30.00 > HD 1280x720p 60.00 > HD 1920x1080p 60.00 > No Video Mode Detected.
Video Input HDMI
HD 1920x1080i 60.00 > HD 1920x1080p 30.00 > HD 1280x720p 60.00, HD 1920x1080p 60.00 > No Video Mode Detected.
NOTE: It is usually best to select “Detect the Video Mode” and let the HDi figure it out. Notice there are many possible video resolutions and seven frame rates. The “4K 3840” settings are only available on Serial Numbers above 2017.
Audio Input Selection.
Embedded When Present > Analog RCA,. This is for HDMI video input. Usually audio is embedded in the HDMI connection, but sometimes it’s available as analog.
Recording file format
.H. 264 (MPEG-4) .mp4 > Generic (MPEG-2). .mpg. > DVD (MPEG-2) .vob
NOTE: The recorded resolution of H.264 and Generic MPEG-2 are the same as the incoming Input video. “,vob” is DVD compatible MPEG-2 scaled to 720x480 (720x576 for PAL) for DVD recording.
Record DVD DualStream?
No, Just [record] the HD Video > Yes, DualStream Target
This option records two video streams at once. The primary stream is the HD that you selected. The optional second stream is DVD-style MPEG-2 format with the “.vob” extension. NOTE: If your subject matter is high-detail, fast action, like a football game, some frame-drop and sync issues may occur.
Video Files Stored On: (Record Target)
Internal HDD/Hard Disk > Flash Drive / Front USB > Optical UDF Data Disc -> Volatile RAM/Memory. Special NOTE: Video is usually recorded to HDD, then copied to another destination. Choosing “Optical UDF Data Disc” records direct-to-disc. This causes disc formatting to be started as soon as a disc is inserted and prevents “normal” file copying.
DVD Duration Quality.
Normal Play 2 Hours > Extra Play 3 Hours > Long Play 4 Hours > Extended Play 6 Hours > Highest Quality 1 Hour.
Video file size limit.
Limitless until Media full > Limit File Size to 4GB > Limit File Size to 2GB > Limit File Size to 1GB. When the size limit is reached, recording stops and restarts with a new filename. There will be about a ½ second gap between files. File size limit is determined by the “DVD Duration Quality” setting
.
Timestamp in video
None > Date > Time > Date and Time
Save load the settings ----VERY IMPORTANT---
Save As Your Default > Save Preset-1 Config > Save Preset-2 Config > Save Preset-3 Config > Reload Saved default > Load Preset-1 Config > Load Preset-3 Config > Load Preset-3 Config Reset to OEM default > Save As Your Default
NOTE: It is very important to “Save As Your Default” after configuring your system. It will boot up that way when you repower the system.
Play/File Menu
Press Play to see video <filenames>
NOTE: Use this to select the file you want to play or to select files for action. Use < > to change files. Press Enter on a file to Select it for further action(see the “+” in front of the filename.
File Operations Menu
(Down from the PLAY Menu)
Copy or Delete Files
Copy to Optical Disc > Make DVD-Video (Text) > Make DVD-Video (Icon) > Erase the Optical Disc(+RW only) > Copy to the Front USB > Delete *ALL*Video*Files > Delete Selected Files > Convert to DVD Format
![]() BCD Products are Made In the USA. Prices and Specifications are subject to change without notice. Quotations are valid for 30 days. Copyright © 1995 - 2018 BCD Associates, Inc. All rights reserved. DVD-1150, HDi-250, TC-100, VC-16 and SB-100 are trademarks of BCD Associates, Inc. All other tradenames mentioned are property of their respective owners.
BCD Products are Made In the USA. Prices and Specifications are subject to change without notice. Quotations are valid for 30 days. Copyright © 1995 - 2018 BCD Associates, Inc. All rights reserved. DVD-1150, HDi-250, TC-100, VC-16 and SB-100 are trademarks of BCD Associates, Inc. All other tradenames mentioned are property of their respective owners.